Goal
In this tutorial, we will use the Locale in order to change the locale of a Chat.
The application will be able to switch the discussion locale between English and Japanese.
Warning
This tutorial aims to switch locale at the very limited level of the chat.
According to your use case, you could prefer to manage the locale more globally,
at application level. If so, follow the Android best practice:
https://developer.android.com/guide/topics/resources/localization.
Prerequisites
Before stepping in this tutorial, you should:
Let’s start a new project
For further details, see: Creating a robot application.
First, we need to create 2 topic files: one in English, and the other in Japanese.
English
Create a new topic file named hello.top for the English (en) language.
Add the following content to this file:
topic: ~hello()

proposal: %start Say hello to start the discussion.

u:(hello) hello
Move it to the assets folder and rename it to hello-en.top.
Japanese
Create a new topic file named hello.top for the Japanese (ja) language.
Add the following content to this file:
topic: ~hello()

proposal: %start 会話を始めるためには、スタート、と言ってください!

u:(こんにちは) こんにちは
Move it to the assets folder and rename it to hello-ja.top.
In the same way, we need to create 2 Chat actions: one in English, and the other in Japanese.
Add the following buildChat method to your MainActivity:
private buildChat(qiContext: QiContext, topicAssetName: String, locale: Locale): Chat {
    // Create a topic from the asset file.
    val topic: Topic = TopicBuilder.with(qiContext)
            .withAsset(topicAssetName)
            .build()

    val startBookmark = topic.bookmarks["start"]

    // Create a new QiChatbot with the specified Locale.
    val qiChatbot: QiChatbot = QiChatbotBuilder.with(qiContext)
            .withTopic(topic)
            .withLocale(locale)
            .build()

    // Create a new Chat action with the specified Locale.
    val chat: Chat = ChatBuilder.with(qiContext)
            .withChatbot(qiChatbot)
            .withLocale(locale)
            .build()

    chat.addOnStartedListener {
        Log.i(TAG, "Discussion is now in ${locale.language}.")
        qiChatbot?.async()?.goToBookmark(startBookmark, AutonomousReactionImportance.HIGH, AutonomousReactionValidity.IMMEDIATE)
    }

    return chat
}
private Chat buildChat(QiContext qiContext, String topicAssetName, Locale locale) {
    // Create a topic from the asset file.
    Topic topic = TopicBuilder.with(qiContext)
            .withAsset(topicAssetName)
            .build();

    Bookmark startBookmark = topic.getBookmarks().get("start");

    // Create a new QiChatbot with the specified Locale.
    QiChatbot qiChatbot = QiChatbotBuilder.with(qiContext)
            .withTopic(topic)
            .withLocale(locale)
            .build();

    // Create a new Chat action with the specified Locale.
    Chat chat = ChatBuilder.with(qiContext)
            .withChatbot(qiChatbot)
            .withLocale(locale)
            .build();

    chat.addOnStartedListener(() -> {
        Log.i(TAG, "Discussion is now in " + locale.getLanguage() + ".");
        qiChatbot.async().goToBookmark(startBookmark, AutonomousReactionImportance.HIGH, AutonomousReactionValidity.IMMEDIATE);
    });

    return chat;
}
In this implementation, we:
TopicBuilder and the withAsset method to create a Topic with the specified asset file.Bookmark.QiChatbotBuilder and the withLocale method to create a QiChatbot with the specified Locale.ChatBuilder and the withLocale method to create a Chat with the specified Locale.Chat to go to the “start” Bookmark when the Chat starts.Chat.We will now create the Chat actions.
Store 2 Chat actions in your MainActivity:
// Store the Chat actions.
private var chatEN: Chat? = null
private var chatJA: Chat? = null
// Store the Chat actions.
private Chat chatEN;
private Chat chatJA;
Add the following buildEnglishChat and buildJapaneseChat methods to your MainActivity:
private fun buildEnglishChat(qiContext: QiContext) {
    val locale: Locale = Locale(Language.ENGLISH, Region.UNITED_STATES)
    chatEN = buildChat(qiContext, "hello-en.top", locale)
}

private fun buildJapaneseChat(qiContext: QiContext) {
    val locale: Locale = Locale(Language.JAPANESE, Region.JAPAN)
    chatJA = buildChat(qiContext, "hello-ja.top", locale)
}
private void buildEnglishChat(QiContext qiContext) {
    Locale locale = new Locale(Language.ENGLISH, Region.UNITED_STATES);
    chatEN = buildChat(qiContext, "hello-en.top", locale);
}

private void buildJapaneseChat(QiContext qiContext) {
    Locale locale = new Locale(Language.JAPANESE, Region.JAPAN);
    chatJA = buildChat(qiContext, "hello-ja.top", locale);
}
Here we provide the asset file name and the corresponding Locale to the buildChat method.
In the onRobotFocusGained method, call these 2 methods:
override fun void onRobotFocusGained(qiContext: QiContext) {
    // Prepare the Chat actions.
    buildEnglishChat(qiContext)
    buildJapaneseChat(qiContext)
}
@Override
public void onRobotFocusGained(QiContext qiContext) {
    // Prepare the Chat actions.
    buildEnglishChat(qiContext);
    buildJapaneseChat(qiContext);
}
In the onRobotFocusLost method, remove the listeners from the Chat actions:
override fun onRobotFocusLost() {
    // Remove the listeners from the Chat actions.
    chatEN?.removeAllOnStartedListeners()
    chatJA?.removeAllOnStartedListeners()
}
@Override
public void onRobotFocusLost() {
    // Remove the listeners from the Chat actions.
    if (chatEN != null) {
        chatEN.removeAllOnStartedListeners();
    }
    if (chatJA != null) {
        chatJA.removeAllOnStartedListeners();
    }
}
Now that we have built the Chat actions, we will create the methods to run them.
Store a Future<Void> in your MainActivity:
// Store the action execution future.
private var currentChatFuture: Future<Void>? = null
// Store the action execution future.
private Future<Void> currentChatFuture;
Add the following runChat method to your MainActivity:
private fun runChat(chat: Chat) {
    if (chat == null) return
    currentChatFuture = chat.async().run()
}
private void runChat(Chat chat) {
    if (chat == null) return;
    currentChatFuture = chat.async().run();
}
Before running the Chat action, we need to cancel the current discussion, if any.
Add the following switchToChat method to your MainActivity:
private fun switchToChat(chat: Chat) {
    currentChatFuture?.let {
        // Cancel the current discussion.
        it.requestCancellation()
        // Run the Chat when the discussion stops.
        it.thenConsume { runChat(chat) }
    } else {
        // If no current discussion, just run the Chat.
        runChat(chat)
    }
}
private void switchToChat(Chat chat) {
    if (currentChatFuture != null) {
        // Cancel the current discussion.
        currentChatFuture.requestCancellation();
        // Run the Chat when the discussion stops.
        currentChatFuture.thenConsume(ignored -> runChat(chat));
    } else {
        // If no current discussion, just run the Chat.
        runChat(chat);
    }
}
To run the Chat actions, we will use 2 RadioButton in the UI.
Modify your activity_main.xml file with the following code:
<?xml version="1.0" encoding="utf-8"?>
<android.support.constraint.ConstraintLayout xmlns:android="http://schemas.android.com/apk/res/android"
    xmlns:app="http://schemas.android.com/apk/res-auto"
    xmlns:tools="http://schemas.android.com/tools"
    android:layout_width="match_parent"
    android:layout_height="match_parent"
    tools:context=".MainActivity">

    <RadioGroup
        android:layout_width="0dp"
        android:layout_height="0dp"
        android:layout_marginBottom="8dp"
        android:layout_marginEnd="8dp"
        android:layout_marginStart="8dp"
        android:layout_marginTop="8dp"
        android:gravity="center"
        app:layout_constraintBottom_toBottomOf="parent"
        app:layout_constraintEnd_toEndOf="parent"
        app:layout_constraintStart_toStartOf="parent"
        app:layout_constraintTop_toTopOf="parent">

        <RadioButton
            android:id="@+id/en_button"
            android:layout_width="wrap_content"
            android:layout_height="0dp"
            android:layout_weight="1"
            android:gravity="center"
            android:text="EN" />

        <RadioButton
            android:id="@+id/ja_button"
            android:layout_width="wrap_content"
            android:layout_height="0dp"
            android:layout_weight="1"
            android:gravity="center"
            android:text="JA" />
    </RadioGroup>

</android.support.constraint.ConstraintLayout>
Add the button listener code in the onCreate method:
// Change the locale to English when checked.
en_button.setOnCheckedChangeListener { buttonView, isChecked -> {
    if (isChecked) {
        switchToChat(chatEN)
    }
}}

// Change the locale to Japanese when checked.
ja_button.setOnCheckedChangeListener { buttonView, isChecked -> {
    if (isChecked) {
        switchToChat(chatJA)
    }
}}
// Store 2 RadioButton in your top MainActivity.
private RadioButton enButton;
private RadioButton jaButton;

// Add the button references and the listeners in the onCreate method.
enButton = findViewById(R.id.en_button);
jaButton = findViewById(R.id.ja_button);

// Change the locale to English when checked.
enButton.setOnCheckedChangeListener((buttonView, isChecked) -> {
    if (isChecked) {
        switchToChat(chatEN);
    }
});

// Change the locale to Japanese when checked.
ja_button.setOnCheckedChangeListener((buttonView, isChecked) -> {
    if (isChecked) {
        switchToChat(chatJA);
    }
});
Here we find the buttons and we run the corresponding Chat action when the button is checked.
We will now change the buttons state depending on the application state.
Add the following enableButtons and disableButtons methods to your MainActivity:
private fun disableButtons() {
    runOnUiThread {
        en_button.isEnabled = false
        ja_button.isEnabled = false
    }
}

private fun enableButtons() {
    runOnUiThread {
        enButton.isEnabled = true
        jaButton.isEnabled = true
    }
}
private void disableButtons() {
    runOnUiThread(() -> {
        enButton.setEnabled(false);
        jaButton.setEnabled(false);
    });
}

private void enableButtons() {
    runOnUiThread(() -> {
        enButton.setEnabled(true);
        jaButton.setEnabled(true);
    });
}
When the Activity becomes visible, we want the buttons to be disabled and unchecked.
Add this code in the onResume method:
override protected fun onResume() {
    super.onResume()

    // Disable and uncheck buttons.
    disableButtons()
    en_button.isChecked = false
    ja_button.isChecked = false
}
@Override
protected void onResume() {
    super.onResume();

    // Disable and uncheck buttons.
    disableButtons();
    enButton.setChecked(false);
    jaButton.setChecked(false);
}
When the Chat actions are built, we want to enable the buttons.
Call enableButtons in onRobotFocusGained:
override fun onRobotFocusGained(qiContext: QiContext) {
    // Prepare the Chat actions.
    buildEnglishChat(qiContext)
    buildJapaneseChat(qiContext)

    enableButtons()
}
@Override
public void onRobotFocusGained(QiContext qiContext) {
    // Prepare the Chat actions.
    buildEnglishChat(qiContext);
    buildJapaneseChat(qiContext);

    enableButtons();
}
When the user clicks on a button, we want to disable both buttons.
Call disableButtons in the buttons listener:
// Change the locale to English when checked.
en_button.setOnCheckedChangeListener { buttonView, isChecked -> {
    if (isChecked) {
        disableButtons()
        switchToChat(chatEN)
    }
}}

// Change the locale to Japanese when checked.
ja_button.setOnCheckedChangeListener { buttonView, isChecked -> {
    if (isChecked) {
        disableButtons()
        switchToChat(chatJA)
    }
}}
// Change the locale to English when checked.
enButton.setOnCheckedChangeListener((buttonView, isChecked) -> {
    if (isChecked) {
        disableButtons();
        switchToChat(chatEN);
    }
});

// Change the locale to Japanese when checked.
jaButton.setOnCheckedChangeListener((buttonView, isChecked) -> {
    if (isChecked) {
        disableButtons();
        switchToChat(chatJA);
    }
});
When a Chat action starts, we want to enable the buttons.
Call enableButtons in buildChat, in the Chat started listener:
// Enable buttons when the Chat starts.
chat.addOnStartedListener {
    enableButtons()
    Log.i(TAG, "Discussion is now in ${locale.language}.");
    qiChatbot.async().goToBookmark(startBookmark, AutonomousReactionImportance.HIGH, AutonomousReactionValidity.IMMEDIATE)
}
// Enable buttons when the Chat starts.
chat.addOnStartedListener(() -> {
    enableButtons();
    Log.i(TAG, "Discussion is now in " + locale.getLanguage() + ".");
    qiChatbot.async().goToBookmark(startBookmark, AutonomousReactionImportance.HIGH, AutonomousReactionValidity.IMMEDIATE);
});
![]() The sources for this tutorial are available on GitHub.
The sources for this tutorial are available on GitHub.
| Step | Action |
|---|---|
Install and run the application. For further details, see: Running an application. |
|
Choose “Mastering Chat locale”. Wait for the buttons to be enabled. |
|
Choose “EN”. Pepper starts the discussion in English. |
|
Choose “JA”. Pepper starts the discussion in Japanese. 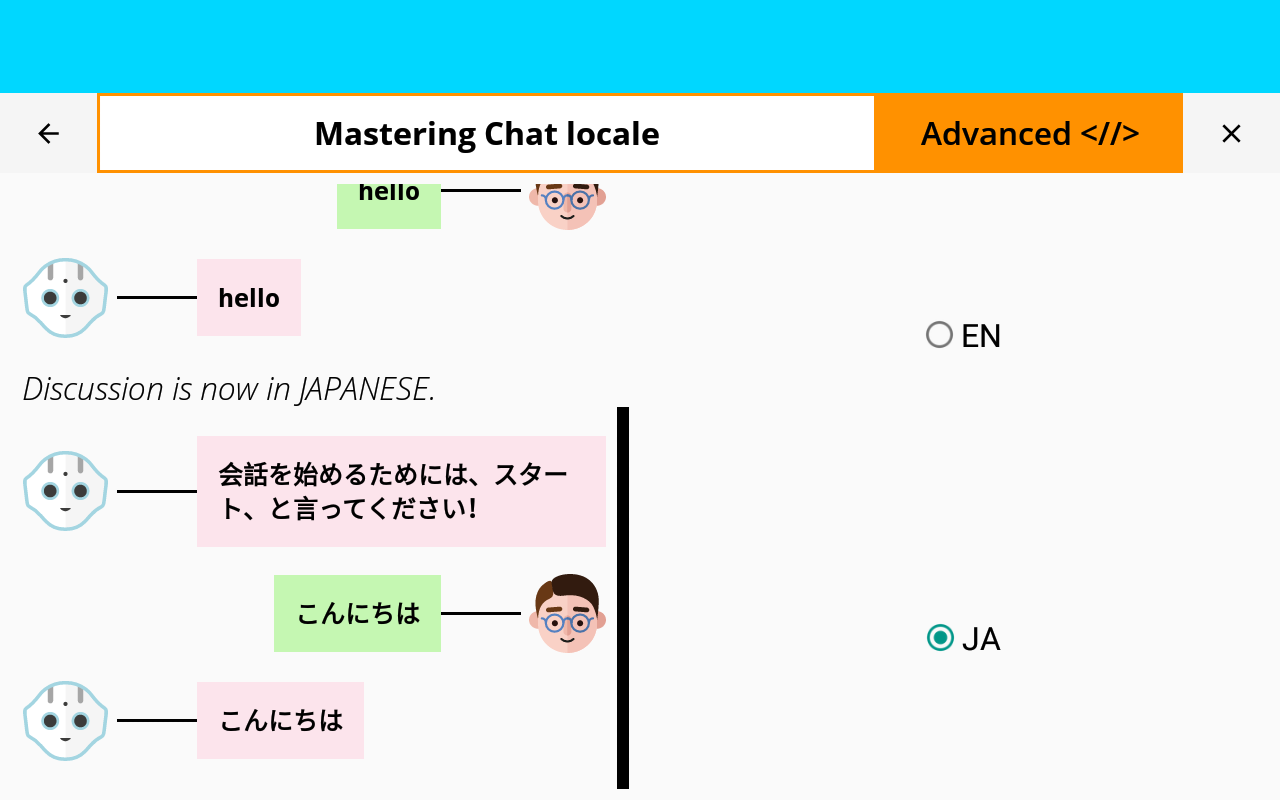
|
You are now able to change the locale of a discussion!