![]() Cannot be tested on an emulated robot, requires a real robot.
Cannot be tested on an emulated robot, requires a real robot.
Goal
In this tutorial, we will see how to save a specific location and how to make Pepper go to this location, using FreeFrames.
Prerequisites
Before stepping in this tutorial, you should:
Let’s start a new project
For further details, see: Creating a robot application.
To save locations, you will need the following fields in your MainActivity:
// Store the saved locations.
private val savedLocations = mutableMapOf<String, FreeFrame>()
// The QiContext provided by the QiSDK.
private var qiContext: QiContext? = null
// Store the Actuation service.
private var actuation: Actuation? = null
// Store the Mapping service.
private var mapping: Mapping? = null
// Store the saved locations.
private Map<String, FreeFrame> savedLocations = new HashMap<>();
// The QiContext provided by the QiSDK.
private QiContext qiContext;
// Store the Actuation service.
private Actuation actuation;
// Store the Mapping service.
private Mapping mapping;
In the onRobotFocusGained method, add the following code:
// Store the provided QiContext and services.
this.qiContext = qiContext;
actuation = qiContext.actuation
mapping = qiContext.mapping
// Store the provided QiContext and services.
this.qiContext = qiContext;
actuation = qiContext.getActuation();
mapping = qiContext.getMapping();
In the onRobotFocusLost method, add the following code:
// Remove the QiContext.
qiContext = null
// Remove the QiContext.
qiContext = null;
To save the robot current location, we will retrieve the robot frame, create a
FreeFrame at this location and finally store it inside a
Map<String, FreeFrame>.
Add this method to your MainActivity:
fun saveLocation(location: String) {
    // Get the robot frame asynchronously.
    val robotFrameFuture = actuation?.async()?.robotFrame()
    robotFrameFuture?.andThenConsume { robotFrame ->
        // Create a FreeFrame representing the current robot frame.
        val locationFrame: FreeFrame? = mapping?.makeFreeFrame()
        val transform: Transform = TransformBuilder.create().fromXTranslation(0.0)
        locationFrame.update(robotFrame, transform, 0L)

        // Store the FreeFrame.
        savedLocations.put(location, locationFrame);
    }
}
void saveLocation(final String location) {
    // Get the robot frame asynchronously.
    Future<Frame> robotFrameFuture = actuation.async().robotFrame();
    robotFrameFuture.andThenConsume(robotFrame -> {
        // Create a FreeFrame representing the current robot frame.
        FreeFrame locationFrame = mapping.makeFreeFrame();
        Transform transform = TransformBuilder.create().fromXTranslation(0);
        locationFrame.update(robotFrame, transform, 0L);

        // Store the FreeFrame.
        savedLocations.put(location, locationFrame);
    });
}
Now that we know how to save a location, we can make Pepper go to it.
We need to get the FreeFrame from the map and execute a GoTo
action with it.
Add a GoTo field in your MainActivity:
// Store the GoTo action.
private var goTo: GoTo? = null
// Store the GoTo action.
private GoTo goTo;
Add this method to your MainActivity:
fun goToLocation(location: String) {
    // Get the FreeFrame from the saved locations.
    val freeFrame: FreeFrame = savedLocations[location]

    // Extract the Frame asynchronously.
    val frameFuture: Future<Frame> = freeFrame.async().frame()
    frameFuture.andThenCompose { frame ->
        // Create a GoTo action.
        goTo = GoToBuilder.with(qiContext)
                .withFrame(frame)
                .build()

        // Display text when the GoTo action starts.
        goTo.addOnStartedListener { Log.i(TAG, "Moving...") }

        // Execute the GoTo action asynchronously.
        return goTo.async().run();
    }.thenConsume { future ->
        if (future.isSucces) {
            Log.i(TAG, "Location reached: $location")
        } else if (future.hasError) {
            Log.e(TAG, "Go to location error", future.error)
        }
    }
}
void goToLocation(final String location) {
    // Get the FreeFrame from the saved locations.
    FreeFrame freeFrame = savedLocations.get(location);

    // Extract the Frame asynchronously.
    Future<Frame> frameFuture = freeFrame.async().frame();
    frameFuture.andThenCompose(frame -> {
        // Create a GoTo action.
        goTo = GoToBuilder.with(qiContext)
                .withFrame(frame)
                .build();

        // Display text when the GoTo action starts.
        goTo.addOnStartedListener(() -> Log.i(TAG, "Moving..."));

        // Execute the GoTo action asynchronously.
        return goTo.async().run();
    }).thenConsume(future -> {
        if (future.isSuccess()) {
            Log.i(TAG, "Location reached: " + location);
        } else if (future.hasError()) {
            Log.e(TAG, "Go to location error", future.getError());
        }
    });
}
Do not forget to remove this listener on GoTo in the
onRobotFocusLost method:
// Remove on started listeners from the GoTo action.
goTo?.removeAllOnStartedListeners()
// Remove on started listeners from the GoTo action.
if (goTo != null) {
    goTo.removeAllOnStartedListeners();
}
We will implement this functionality using:
add_item_edit to enter the location name,Button to save the location,Spinner to display the saved locations and the selected one,Button to make Pepper move to the selected location.Modify your activity_main.xml file with the following code:
<?xml version="1.0" encoding="utf-8"?>
<android.support.constraint.ConstraintLayout xmlns:android="http://schemas.android.com/apk/res/android"
    xmlns:app="http://schemas.android.com/apk/res-auto"
    xmlns:tools="http://schemas.android.com/tools"
    android:layout_width="match_parent"
    android:layout_height="match_parent"
    android:focusableInTouchMode="true"
    tools:context=".MainActivity">

    <Button
        android:id="@+id/save_button"
        android:layout_width="wrap_content"
        android:layout_height="wrap_content"
        android:text="@string/save"
        app:layout_constraintRight_toLeftOf="@+id/add_item_edit"
        app:layout_constraintLeft_toLeftOf="parent"
        app:layout_constraintBottom_toTopOf="@+id/goto_button"
        app:layout_constraintTop_toTopOf="parent" />

    <Button
        android:id="@+id/goto_button"
        android:layout_width="wrap_content"
        android:layout_height="wrap_content"
        android:text="@string/go_to_text"
        app:layout_constraintLeft_toLeftOf="@+id/save_button"
        app:layout_constraintRight_toRightOf="@+id/save_button"
        app:layout_constraintHorizontal_bias="0.0"
        app:layout_constraintBottom_toBottomOf="parent"
        app:layout_constraintTop_toBottomOf="@+id/save_button" />

    <EditText
        android:id="@+id/add_item_edit"
        android:layout_width="wrap_content"
        android:layout_height="wrap_content"
        android:ems="10"
        android:inputType="text"
        android:labelFor="@+id/add_item_edit"
        android:hint="@string/location"
        tools:text="Location"
        app:layout_constraintBaseline_toBaselineOf="@+id/save_button"
        app:layout_constraintRight_toRightOf="parent"
        app:layout_constraintLeft_toRightOf="@+id/save_button" />

    <Spinner
        android:id="@+id/spinner"
        android:layout_width="0dp"
        android:layout_height="wrap_content"
        app:layout_constraintLeft_toLeftOf="@+id/add_item_edit"
        app:layout_constraintRight_toRightOf="@+id/add_item_edit"
        app:layout_constraintTop_toTopOf="@+id/goto_button"
        app:layout_constraintBottom_toBottomOf="@+id/goto_button"
        app:layout_constraintHorizontal_bias="0.0" />

</android.support.constraint.ConstraintLayout>
Add the following fields in your MainActivity:
private lateinit var spinnerAdapter: ArrayAdapter<String>

// Store the selected location.
private var selectedLocation: String? = null
private Button gotoButton;
private Button saveButton;
private ArrayAdapter<String> spinnerAdapter;

// Store the selected location.
private String selectedLocation;
And add this code in the onCreate method:
// Save location on save button clicked.
save_button.setOnClickListener {
    val location: String = add_item_edit.text.toString()
    add_item_edit.text.clear()
    // Save location only if new.
    if (location.isNotEmpty() && !savedLocations.containsKey(location)) {
        spinnerAdapter.add(location)
        saveLocation(location)
    }
}

// Go to location on go to button clicked.
goto_button.setOnClickListener {
    selectedLocation?.let {
        goto_button.isEnabled = false
        save_button.isEnabled = false
        goToLocation(it)
    }
}

 spinner.onItemSelectedListener = object : AdapterView.OnItemSelectedListener {
    override fun onItemSelected(parent: AdapterView<*>, view: View, position: Int, id: Long) {
        selectedLocation = parent.getItemAtPosition(position) as String
        Log.i(TAG, "onItemSelected: $selectedLocation")
    }

    override fun onNothingSelected(parent: AdapterView<*>) {
        selectedLocation = null
        Log.i(TAG, "onNothingSelected")
    }
}

// Setup spinner adapter.
spinnerAdapter = ArrayAdapter(this, android.R.layout.simple_spinner_item, ArrayList())
spinnerAdapter.setDropDownViewResource(android.R.layout.simple_spinner_dropdown_item)
spinner.adapter = spinnerAdapter
final EditText addItemEdit = (EditText) findViewById(R.id.add_item_edit);
final Spinner spinner = (Spinner) findViewById(R.id.spinner);

// Save location on save button clicked.
saveButton = (Button) findViewById(R.id.save_button);
saveButton.setOnClickListener(v -> {
    String location = addItemEdit.getText().toString();
    addItemEdit.setText("");
    // Save location only if new.
    if (!location.isEmpty() && !savedLocations.containsKey(location)) {
        spinnerAdapter.add(location);
        saveLocation(location);
    }
});

// Go to location on go to button clicked.
gotoButton = (Button) findViewById(R.id.goto_button);
gotoButton.setOnClickListener(v -> {
    if (selectedLocation != null) {
        gotoButton.setEnabled(false);
        saveButton.setEnabled(false);
        goToLocation(selectedLocation);
    }
});

// Store location on selection.
spinner.setOnItemSelectedListener(new AdapterView.OnItemSelectedListener() {
    @Override
    public void onItemSelected(AdapterView<?> parent, View view, int position, long id) {
        selectedLocation = (String) parent.getItemAtPosition(position);
        Log.i(TAG, "onItemSelected: " + selectedLocation);
    }

    @Override
    public void onNothingSelected(AdapterView<?> parent) {
        selectedLocation = null;
        Log.i(TAG, "onNothingSelected");
    }
});

// Setup spinner adapter.
spinnerAdapter = new ArrayAdapter<>(this, android.R.layout.simple_spinner_item, new ArrayList<String>());
spinnerAdapter.setDropDownViewResource(android.R.layout.simple_spinner_dropdown_item);
spinner.setAdapter(spinnerAdapter);
When Pepper is ready to save locations, we want to enable the UI elements.
Add this method to your MainActivity:
private fun waitForInstructions() {
    Log.i(TAG, "Waiting for instructions...")
    runOnUiThread {
        save_button.isEnabled = true
        goto_button.isEnabled = true
    }
}
private void waitForInstructions() {
    Log.i(TAG, "Waiting for instructions...");
    runOnUiThread(() -> {
        saveButton.setEnabled(true);
        gotoButton.setEnabled(true);
    });
}
Call this method at the end of onRobotFocusGained:
// Store the provided QiContext and services.
this.qiContext = qiContext
actuation = qiContext.actuation
mapping = qiContext.mapping

waitForInstructions()
// Store the provided QiContext and services.
this.qiContext = qiContext;
actuation = qiContext.getActuation();
mapping = qiContext.getMapping();

waitForInstructions();
And in the .thenConsume(...) inside the goToLocation method:
if (future.isSuccess) {
    Log.i(TAG, "Location reached: $location")
    waitForInstructions()
} else if (future.hasError()) {
    Log.e(TAG, "Go to location error", future.error)
    waitForInstructions()
}
if (future.isSuccess()) {
    Log.i(TAG, "Location reached: " + location);
    waitForInstructions();
} else if (future.hasError()) {
    Log.e(TAG, "Go to location error", future.getError());
    waitForInstructions();
}
In this tutorial, the locations persistence is scoped to the Activity lifetime.
If you need to make these locations persist for a longer time, you can:
Localize the robot (see Localize).
Create the locations (FreeFrame).
Compute the Transform between each FreeFrame and the map frame:
val locationFrame: FreeFrame = ...

val mapFrame: Frame = qiContext.mapping.mapFrame()
val transform: Transform = locationFrame.frame().computeTransform(mapFrame).transform
FreeFrame locationFrame = ...;

Frame mapFrame = qiContext.getMapping().mapFrame();
Transform transform = locationFrame.frame().computeTransform(mapFrame).getTransform();
Serialize each Transform (for example in json).
Save each serialized Transform data (for example in file, database, server, …).
If you want to reuse them later, you can:
Retrieve each serialized Transform data.
Deserialize each data into a Transform.
Localize the robot (see Localize).
Create each FreeFrame with the corresponding Transform:
val transform: Transform = ...

val mapping: Mapping = qiContext.mapping
val mapFrame: Frame = mapping.mapFrame()
val locationFrame: FreeFrame = mapping.makeFreeFrame()
locationFrame.update(mapFrame, transform, 0L)
Transform transform = ...;

Mapping mapping = qiContext.getMapping();
Frame mapFrame = mapping.mapFrame();
FreeFrame locationFrame = mapping.makeFreeFrame();
locationFrame.update(mapFrame, transform, 0L);
![]() The sources for this tutorial are available on GitHub.
The sources for this tutorial are available on GitHub.
| Step | Action |
|---|---|
Install and run the application. For further details, see: Running an application. |
|
| Choose “Saving locations”. | |
Enter “Room” in the The |
|
| Open the robot hatch and move him somewhere else. Then close his hatch. | |
Enter “Kitchen” in the The |
|
Select “Room” on the Pepper will go to the “Room” location. When he arrives, the log trace “Location reached: Room” is displayed in the console. 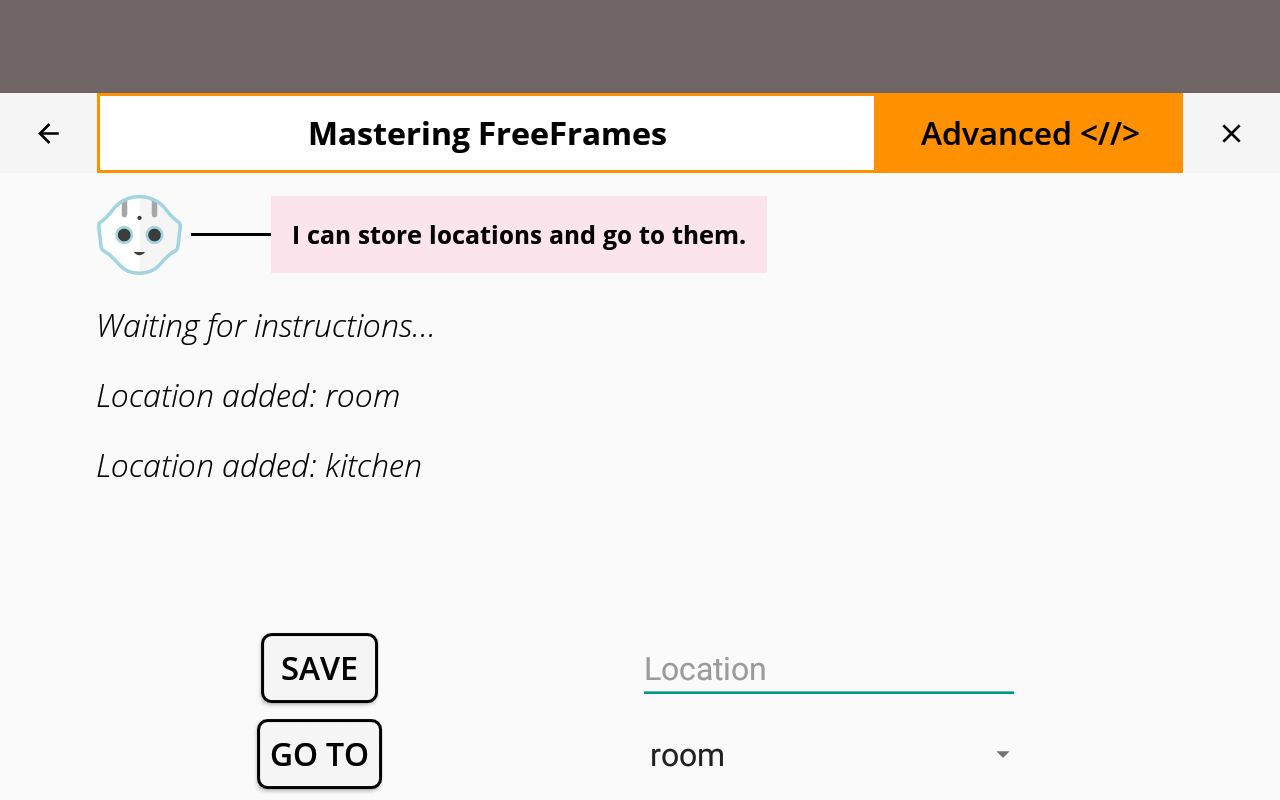
|
You are now able to store locations and make Pepper go to them!